WHMCS is a set of domain name host management software that we are familiar with. It is designed to be very user-friendly in terms of user management, financial management, domain name interface, server management panel interface, etc. WHMCS is a set of one-stop management software that fully supports domain name registration management and resolution, host activation management, VPS activation management and server management. It has been used by more and more Chinese IDCs. Many friends left messages hoping to see some basic WHMCS common sense, plus the needs of WHMCS host users sold by VPSAA, so here is a simple guide from installation to basic settings for a good VPS.
This article describes the WHMCS installation process. First, the things we need to prepare include a host (or VPS, or independent server) for installing WHMCS and a genuine WHMCS authorization. The host where WHMCS is installed needs ionCube component support. In addition, when applying for authorization, first clarify the domain name or directory where WHMCS is installed. For example, my.vpsaa.com uses this domain name for authorization.
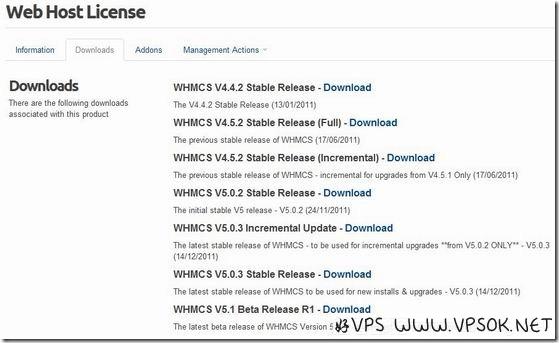
Then, we log in to the WHMCS User Center, click on Products/Services, Authorization Services, view my authorization information, and download the latest official version of WHMCS source code on the Downloads page.

As shown above, the latest official version is the V5.1 beta version. I recommend that you download the V5.0.3 stable version. After the download is completed, unzip the compressed package and there will be a WHMCS folder. This is the WHMCS installation program source code we need. Zip the contents of the folder and transfer it to the directory where you want to install WHMCS, and then unzip it (I It is not recommended to open an FTP and slowly transfer files one by one there, that is the slowest and stupidest way).
After the file is uploaded and decompressed, we still need to do two tasks: first, create a database; second, rename configuration.php.new to configuration.php. Before doing this, please make sure that the domain name you plan to use to access WHMCS has been correctly resolved to the IP of the space. Next to start the installation process, visit our domain name.
Welcome to WHMCS!
Before you can begin using WHMCS you need to perform the installation procedure. Click here to begin…
Do you see the words above? Why are you still standing there? Click here to begin…, Let’s go! On the first page, user license agreement, select I accept (can you accept it if you don’t accept it?). On the next page, check the system environment and configuration files, etc. If they are all Passed, it is OK. If you just renamed the configuration The file has not been modified as I said. There will be a prompt now. Next, continue! The following page is for filling in more important information, including authorization number, database and other information, as shown in the picture:

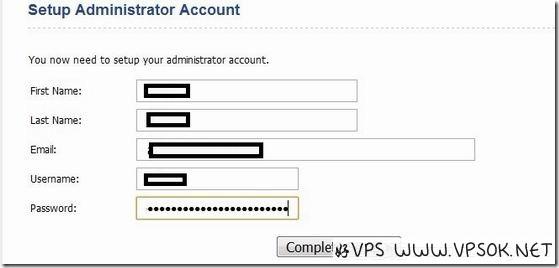
The next page is also for some important information, including your name, which will be used for WHMCS username and password, etc.

Finally, complete the installation! The next page tells us to delete the install folder and do so; make sure the directory is writable and apache ignores it; finally, there is a link to click to enter the management login page. We can go to the backend, or choose to go to the WHMCS homepage (or (User Center) Take a look at our results.
In this article, we mainly talk about the WHMCS installation process. In fact, the installation process is relatively simple. It is the same as when we install wordpress and discuz. In the following articles, we will talk about the WHMCS installation process. Backend Chinese language pack and simple settings.
☆☆☆Original article - Reprinting is not allowed☆☆☆
If you want to purchase a genuine WHMCS license, it is only 7 yuan per month, and the annual payment is more favorable, welcome to choose!
Click to order free genuine whmcs host→

