Many friends have left messages hoping that Good VPS can provide tutorials on WHMCS. In fact, I am basically a novice when it comes to WHMCS, so I have never dared to make mistakes. However, based on everyone's urgent needs, I decided to briefly talk about how to use WHMCS to associate with WHM/cPanel to automatically activate the host.
Before doing this work, we must prepare the following materials: 1. Install the WHMCS site (we recommend that you obtain WHMCS authorization through legal means, we do not encourage the use of pirated and cracked software); 2. WHM/cPanel space (Note that this is not an ordinary cPanel space, WHM is the control end, and cPanel is the user end).
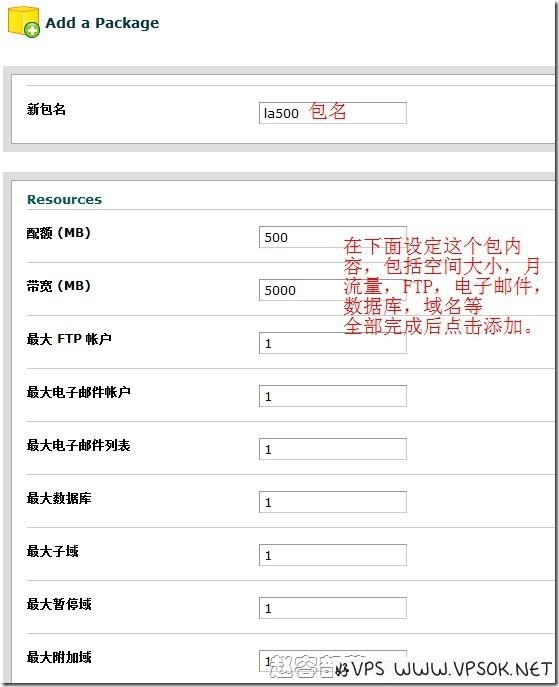
Okay, now we start to integrate WHMCS and WHM/cPanel. First, we need to add resource packages (Packages) to WHM/cPanel. This resource package limits the specifications of the host ordered by the user, including space size, monthly traffic, domain name, subdomain name, FTP, database and other quantitative information. Log in to WHM/cPanel (the address is usually the domain name or IP plus port 2086). Click "Packages" to add a resource package (Add a Package).

After everything is completed, click Add and the system will automatically add it. Pay special attention here: the new package name you add is not the complete Packages name. After you click Add to submit, you will see the system prompts "Created the package" which is the complete name!
Ok, the settings on the WHM/cPanel side are like this. Next, log in to the WHMCS backend. In the settings on the WHMCS side, we can follow this step: server-add server-add group, product/service-create group-add product.
First click "setup", "Servers", "Add New Server" to join our WHM/cPanel server.
There are three parts to adding a server: the first part is the server information, the second part is the NS information, and the third part is the login information. The first part includes Name, which can be specified at will; Hostname is the login address you will give your users in the future; IP address is the IP of your host, and the address of the A record of the user domain name resolution. In the second part of the NS server information, you can enter up to four groups of NS servers according to your situation; in the third part, first, select your panel type. The WHM/cPanel we use here of course chooses the Cpanel panel, and then Enter your administrator login username and password, and finally save.
After saving the above server settings, the system automatically returns to the Servers interface. We can see a server we added, with a WHM login shortcut icon behind it. You can log in to WHM/cP)anel directly from here. (Due to some uncomfortable content, the above steps will not take screenshots)
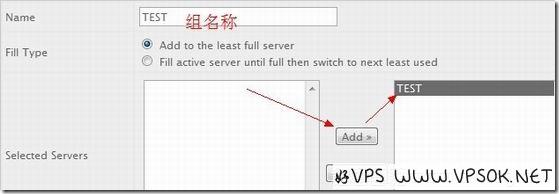
Next, we create a group (Create New Group), click Create New Group, enter a name, then select the server required by this group, and finally Save and it's OK.

Ok, after the above steps, the settings on our server are OK. Next, we set the products/services.
Click Products/Services under Setup. First, we create a product group. Click Create a New Group, enter the group name, click Create Group and submit. Then, we create the product and click Create a New Product.

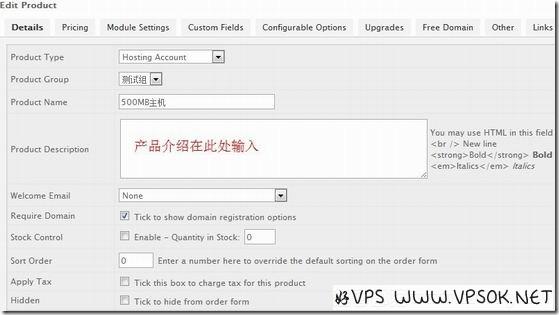
As shown above, in the first line, select the product type, here I choose the host, in the second line, select the group, and in the third line, fill in your product name, or the title of the product. Click Continue when finished. The following page is where the most settings are set. What we mainly need to set include product information, pricing and interface settings. The following is a screenshot of the product information setting page: including product type, group, name, detailed introduction and other information.

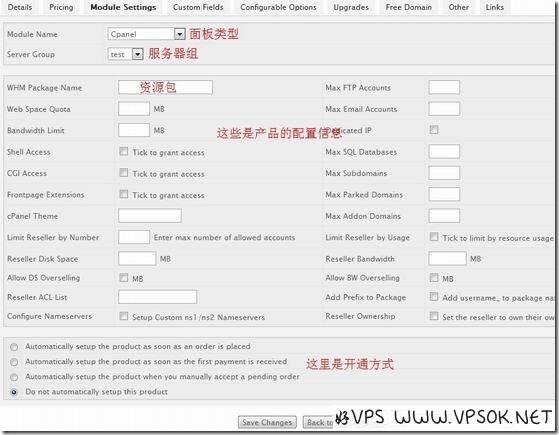
The pricing information of the product does not need to be introduced, it is very simple. There are free, one-time payment, recurring, etc. Let's take a look at the interface settings. As shown in the figure below, it includes product type, server group, resource package, product configuration, activation method, etc.

Save after all is completed. Your WHMCS can now automatically activate the host.
WHMCS integrated DA is basically similar to WHM/cPanel. I believe all my friends are eager to try it. VPSAA provides professional hosting that supports free genuine WHMCS authorization. Friends who need WHMCS hosting can consider it. We will launch Reseller Hosting products in the near future to provide you with all solutions, so stay tuned.
Go to buy free genuine WHMCS host→
Tip: This article is a tutorial for WHMCS integrating WHM/cPanel. Follow this tutorial to successfully activate the host. If you encounter If it cannot be activated, please do not leave a message in this article to ask, I will not answer, thank you.

