After the revision of Vultr, the blog also shared an event at the beginning of this month that they had a free hard drive (Reviewed earlier article). At that time, I said that I would create a new version of the backend ordering process. record, now complete it. Registration for Vultr is very simple. Sign Up is directly available on the homepage of the official website. There is no need to fill in any complicated information. You can register by just entering an email address and a password.
Official website: www.vultr.com

For newly registered users, Vultr often has some recharge and gift activities. It is recommended that new users read the VPS first. Another article by Zhiju: https://www.vpsok.net/coupons/article_3651.html
After new users register, they will automatically go to the recharge page. Use different recharge methods to get different benefits. The gift amount is mostly given by credit card (dual currency card, non-domestic RMB credit card). For old users to recharge, you can see the screenshot below:

Select Biling on the left, then Add Funds, optional Different recharge methods are available, including common PayPal or credit cards, with a minimum recharge of US$5.
Okay, let’s now look at how to create a VPS (purchase a VPS host) step by step. Click Servers on the left menu, and then directly click the + sign on the right, as shown in the figure below.

There are multiple projects to choose from. The first one is to select the data center of the host. You can select it by clicking on the corresponding data center as shown below. There are currently Japanese nodes in Asia.

In the picture above, I have marked the translated text of each commonly used computer room. I chose New Jersey here because the hard drive sent last time can only be added to the New Jersey computer room. You can try it by the way.
Next is the second selection item: operating system. As shown below, there are 64bit or 32bit options. You can choose according to your own needs.

What is important to note here is that Vultr supports the ISO uploaded by the user to install . For example, if you want to install Windows, it will cost extra to choose Windows, so you can upload your own ISO, as shown in the picture below, can be selected and used directly because I have already uploaded it.

If you want to transfer your own operating system, you can click Add New and then click Add ISO (you can also click Servers directly on the left menu for this step, and then click the ISO operation in the upper row), Just provide the ISO http or FTP link URL.
For the above steps, you can also refer to my previous tutorial article:
Next, choose the package you want. This is easy to understand without explanation. The lowest configuration is $5 a month. Vultr's hosting adopts an hourly billing method. After a user creates a VPS, he or she can delete it at any time when it is no longer needed. The system only deducts payment for the user's usage time.

After selecting the package, the following other options determine whether you need IPv6 and whether you need an intranet IP. The following two items are paid: automatic backup and DDoS protection. DDoS protection is currently only available in some computer rooms. You can click (?) to view specific computer rooms. The Server Label after
is similar to the hostname of other VPS hosting providers. It is recommended to write a domain name or a word.

After completion, submit in the lower right corner to start creation. At this time we will see that the status of the backend product is installing. After the installation and configuration is completed, your registered email address will also receive an email telling you After configuration and IP, we can start using it.
If it is the user's own ISO, start installing the system. Here are two more pictures so you can see how to install through your own ISO.

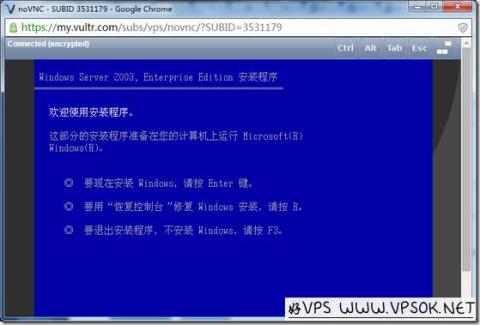
As shown in the picture above, you can see your VPS in Servers on the left. View Console is the VNC function, which is necessary for installation with your own ISO. The other items from top to bottom are Server information, VNC, shutdown, restart, reinstall and delete.
The picture below is my VNC page, you can see that the windows2003 installation starts.

In order to try the free 50GB hard drive activated last time, I deliberately chose to open a New Jersey host this time. I installed the windows system. After completion, first go to Servers on the left, and then click Block Storage, Attach to Instance, select your VPS host, then Attach is equivalent to allocating the hard disk to the host, and then activate it in the host system (Linux system is mounted), it is very simple. If you have any questions, please submit them for discussion. !
Extended reading:
Vultr recharge gift: https://www.vpsok.net/coupons/article_3651.html
Vultr registration tutorial: https://www. vpsok.net/VPS_help/article_4151.html
Vultr installation Win: https://www.vpsok.net/VPS_help/article_2855.html
Vultr official website: www.vultr.com
