I have shared information about Host1plus cloud server. Some readers are interested in it, so I bought one to try. I also took a look at the basic usage of its panel, including self-service ISO uploading, etc., while doing A record for everyone’s reference. The package I purchased is the cheapest monthly payment for Linux system (Product and package introduction). We will share the relevant information in several parts.
Host configuration information: 1 core CPU + 512MB memory + 20GB hard disk + 2TB monthly traffic (unlimited bandwidth, shared 10Gbps) + 1 independent IPv4. The test machine is the Chicago data center in the United States.
Official website: www.host1plus.com

512MB memory, 20GB disk.
There is no specific test on the network line. You can refer to the test IP in the previous article. Generally speaking, Chicago is theoretically better than Germany for domestic access. There are currently no more choices. If it expands to Los Angeles in the future like OpenVZ Even better. The advantage of Host1plus is that it supports Alipay. The risk of running away is slightly lower for established hosting providers. The performance of the product is good, such as bandwidth and IO, etc. In addition, it also has a convenient and practical management panel. For that matter, let me share some usage information of the management panel.

The picture above is the cloud host management panel. The first management VM in the head navigation has power on/off, restart, virtual console (equivalent to VNC) and rescue mode. The VM overview shows the VM configuration, operating system, Data center, bandwidth, IP and password, and optional backup;
In the second network, you can view IP information, including gateway, subnet mask, etc., and also have IPv6. You can also modify and add rDNS on the network page or Add additional IP (purchase);
The third storage item can be set to automatic backup or immediate backup;
The fourth item template, you can choose the system template, reinstall, or upload your own ISO. After this part I will It should be emphasized;
The security, upgrade and financial management behind are very simple. You can change the password on the security page, upgrade the current cloud host configuration on the upgrade page, and see the start and end dates and prices of the host in financial management. If you don’t want to You can also cancel it on this page.
Custom ISO operation instructions
In fact, most of the function menus of the panel can be understood by everyone at a glance. Here I will focus on its user-defined operation of uploading ISO.
In the management panel, we click on Templates, and then scroll down the page. There is a Custom Templates, with Add ISO below. We can see that each user has 10GB of upload space for users to upload their own ISO files.

Next, we click Add ISO. On the pop-up page, we can see the address and template name of the ISO that are required to be filled in. We fill in the correct iso network address, and then click Fetch ISO. During the upload process, You can see the progress percentage.

Note that it may get stuck after clicking. There is no need to click again. After clicking, the page will start automatically.

After the upload is completed, if we want to install the system through this ISO, please click on the uploaded ISO, then select Mount, then restart the host and install it step by step through the virtual console.

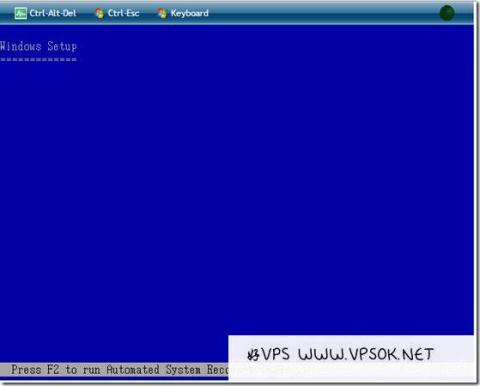
The virtual console of the host management panel is our commonly used vnc function. It is recommended to "open the console in a new tab" for convenient operation.

The picture above is the screen of booting from the CD-ROM drive after I uploaded a Windows ISO.
However, I would like to specifically explain here that I encountered a problem during the installation of windows and could not continue. I tried several different Windows system versions, including 2003 and 2008 (both of which were installed normally on vultr Template), all encountered the problem that the hard disk cannot be detected. This is just a reminder. It may be due to the system driver or the host provider. After all, they have a separate series for Windows. In addition, I am only testing the results through conventional methods. Using DD method under Linux is not included in the discussion. Friends who have already started are also welcome to discuss it together.