In February last year, Hao VPS wrote a custom installation tutorial for 2012. Due to a series of component upgrades, the current DA panel installation has some differences. The official provides more options in order to adapt to the new Due to the situation, I will write the 2013 version of the DA panel installation tutorial again. Of course, it is basically the same as the 2012 installation, with just a few added options.
First of all, we also need a server or VPS, a clean operating system, and the correct authorization. DA authorization is bound to the server's main IP and operating system. If you plan to use it for a long time, you can purchase those lifetime licenses, which are cheaper than paying monthly. Good deal. Of course, you can also use the happy version, as long as you are brave enough (what is the happy version? Lose it, is it 2? Just use it without paying, are you happy?).
wget http://www.directadmin.com/setup.sh #Download script
chmod 755 setup.sh < x2> #Set permissions
./setup.sh <x2 > #Run the installation script
I suggest adding a screen before starting all the steps. After all, it won’t be OK in three or two minutes. For such a long time, you watch him pretend, or if the Internet is disconnected while doing it, it will be very tangled, so develop a good As a habit, it is best to compile on the screen, remember.
Compile and install
For these steps, I mainly use screenshots.

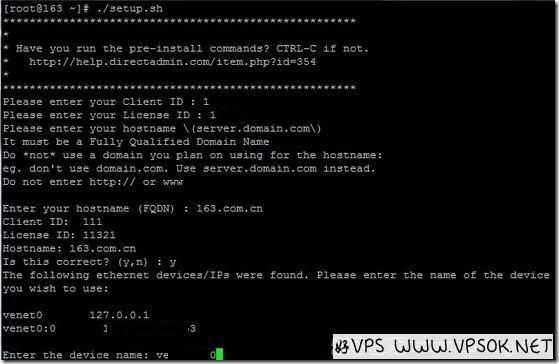
As shown above, first enter the authorization information, then enter your hostname, then select the network card or IP information, and then press Enter to next step. This step is to compare the most changed areas before.

I have copied this information for your reference.
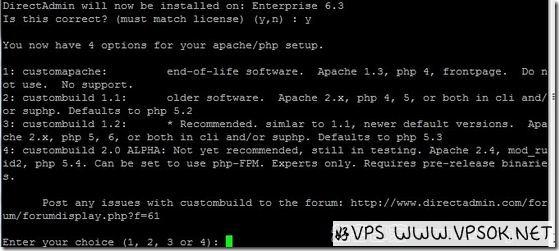
You now have 4 options for your apache/php setup.
1: customapache: end-of-life software. Apache 1.3, php 4, frontpage. Do not use. No support.
2: custombuild 1.1: older software. Apache 2.x, php 4, 5, or both in cli and/or suphp. Defaults to php 5.2
3: custombuild 1.2: * Recommended. simlar to 1.1, newer default versions. Apache 2.x, php 5, 6, or both in cli and/or suphp. Defaults to php 5.3
4: custombuild 2.0 ALPHA: Not yet recommended, still in testing. Apache 2.4, mod_ruid2, php 5.4. Can be set to use php-FPM. Experts only. Requires pre-release binaries.
He provides 4 options for you to choose. The first one is to ignore these components, which are too old; the second one is what we used last year, Apache2.*, PHP5 or 4, the default is PHP5.2.17, optional CGI or CLI ; The third one is currently recommended, Apache2.*, PHP has added version 5 and 6 options, the default is PHP5.3, CGL or CLI mode is optional; the fourth one is still in the testing stage.
I suggest just listen to him and choose the third one.
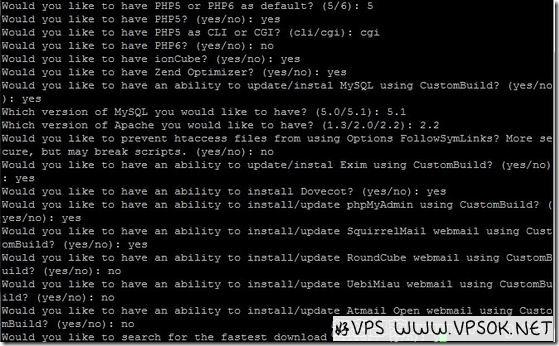
you like the default settings of apache 2.2 and php 5.3 cli? (y/n):n
#Are you ready to install the default apache2.2+php5.3, cli mode, if you want to customize the installation , just choose n.
In this step, if you choose y, you can also wait for the installation to be completed. However, we are playing with customization here, so choose n.
Would you like to have PHP5 or PHP6 as default? (5/6):5
#Ask you to install PHP5 or 6, I choose PHP5
Would you like to have PHP5? (yes/no) : yes
#Ask you if you want PHP5. If not, I will choose 5?
Would you like to have PHP5 as CLI or CGI? (cli/cgi): cgi
#CGI or CLI mode? Select cgi
Would you like to have PHP6? (yes/no): no
#Do you want PHP6? I don’t want it, and I don’t care if you want it or not.
Would you like to have ionCube? (yes/no): yes
#Do you want to install ionCube?
Would you like to have Zend Optimizer? (yes/no): yes
#Do you want to install Zend Optimizer?
Would you like to have an ability to update/instal MySQL using CustomBuild? (yes/no): yes
#Would you like to update/install MySQL?
For the above steps, I chose yes. Last year, I chose no for ionCube and Zend Optimizer, and then customized the installation. I won’t do that this year. Don’t go to trouble to make trouble for yourself. He will pretend to be you. It’s just a pretense, come on as convenient as possible! However, it should be reminded that under PHP5.2 it is Zend Optimizer, but under PHP5.3 it is Zend Guard Loader. I will use screenshots later. It is quite troublesome to copy the annotations one by one. In addition, you can choose these according to your own preferences. You can also follow the ones in my picture.

After the last selection, it will first check the fastest download source on your server, and then start compilation and installation.
This process may take more than 15 minutes, and the specific time varies depending on your server configuration.
After the installation is completed, log in using the default password.

