I did not add the word "free" in the title of this article. In fact, this management panel was initially developed as a commercial panel, developed by Caboo. It is very similar to Linode's management interface. I have seen it in the group these days. I've shown imnpc a few times, and I want to play it again if my hands are itchy. I'll share the process by the way. I'm not familiar with Caboo, it's just a legend. . . Regarding this panel, the copyright belongs to him. Since it has not been updated in the past 2 years and has stopped development, I am publishing it here. If there is any infringement of rights, please contact me in time.
Regarding the installation of LNMP, you can directly refer to the tutorial on Junge’s website: http://lnmp.net/install.html
It should be noted that Pureftpd is a required component and needs to be patched under PHP5.3 (Junge’s website (Instructions are available): http://lnmp.org/faq/fix-pureftpd-bug-mysql-55.html
After the LNMP and FTP installation is completed, please set MySQL to allow root remote connections:
Set MySQL to allow root remote connection:
| 1 |
mysql -u root -p mysql>use mysql; mysql>update user set host = '%' where user = 'root'; mysql>select host, user from user; |
You can also log in to phpmyadmin, click "Permissions" in the header, select root localhost, edit permissions, login information, host, select "any host" (default is local)

The system installation process is mainly about commands. We first download the NginxManager file to the default directory.
| 1 2 3 4 5 6 7 |
mkdir -p /usr/local/nginx/conf/vhost #Create virtual host configuration file directory cd /home/wwwroot/default/ #Go to the default directory mv index.html index2.html<x2 > #Modify the default home page file, or delete it directly wget -c http://dl.zrblog.net/nginxmanager/upload.zip #Download unzip upload.zip #Decompress chown -R www:www * #Permissions chmod 755 -R /home/wwwroot/default/* #Permissions |
Next, restart Nginx.
| 1 2 |
service nginx restart service nginx reload |
(You can also restart lnmp directly: /root/lnmp restart)
Please note that NginxManager has a one-click installation tool in the background. By default, there are 5 commonly used source codes such as wordpress, typecho, discuz, etc. If you need these, Please create the app directory first:
| 1 |
mkdir -p /root/app #Create app directory |
Then, transfer the zip compressed package of the source code to this directory. You can study the specific app yourself.
Then, we import the database and modify the database information in the configuration file.
Database download: http://dl.zrblog.net/nginxmanager/sql.zip
We log in through phpmyadmin, create the database, and then import the database file downloaded above.
Then go to the default directory, find config.php, and modify the database part inside (including database name, database user, password)
| 1 2 3 4 5 |
//Set database connection information $host = 'localhost'; $user = ''; #Database user name $password = ''; #Database password $database = ''; #Database name |
After completion, access the IP and register the user. The first registered user is the administrator. After registration, log in, log out, and log in again. At the bottom of the login page, you can directly click "Administrator Panel".
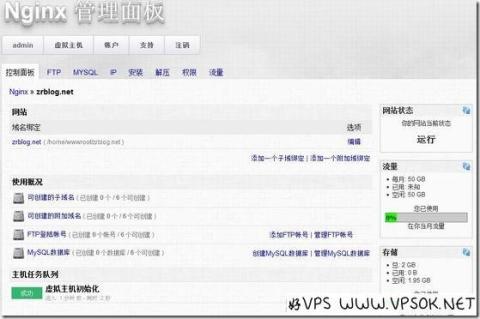
NginxManager use
In the administrator panel, we can add other VPS or servers with LNMP installed.
Click on the virtual host, node, and add a node server:

Do not copy it. At least the Linux Root, MySQL Root and main IP need to be filled in truthfully.
After adding nodes, we can modify the hosting plan, including space size, traffic, price and other information.
The operation of the user panel is also very simple, the functions are very intuitive, and pictures can be uploaded directly.

This article describes it as above. If you encounter problems, you can also leave a message here and let us learn together.
Other reference materials: http://www.imnpc.me/nginxmanager.html