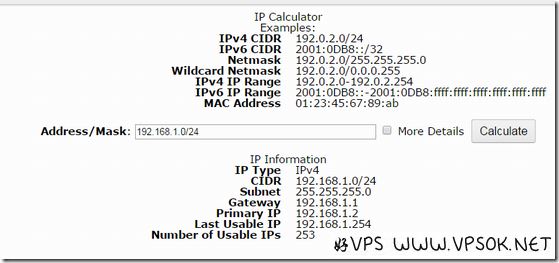
I believe that many of my friends here, like good VPS, are not professional in the Internet. When they encounter problems, they rely on Baidu... They have little knowledge of IP and network segment calculations, especially novice friends who have just come into contact with VPS before. , I also made a joke about /29 thinking it was 29 IPs. Here I share a webpage for calculating IPs provided by the QN computer room that I commonly use. It is suitable for newbies to check occasionally.

IP calculator address: https://services.quadranet.com/utilities/ip
As shown above , for example, the server has allocated a segment IP: 192.168.1.0/24, then enter the Address/Mask box and click Calculate (generally we do not need more information and do not need to select More Details) to get the IP information.
CIDR 192.168.1.0/24 #IP segment
Subnet 255.255.255.0 # Subnet mask
Gateway 192.168.1.1 #Gateway
Primary IP 192.168.1.2 <x2 > #First IP
Last Usable IP 192.168.1.254 #Last IP
Number of Usable IPs 253 #Total number of IPs
The information obtained is basically clear at a glance. Once we know the starting and ending IP, gateway and subnet mask, we can bind the IP to the system. Taking the Windows system as an example, it is very simple to bind the entire IP segment in batches. Start. Run, CMD (command prompt), take binding the IP calculated above as an example:
for /l %i in (2,1,254) do netsh interface ip add address "Local Connection" 192.168.1. %i 255.255.255.0
Pay attention to "Local Area Connection" in this line. Please check the name of the connection in the system. For example, it may be Local Area Connection 2, or Windows 2012 may be Ethernet, or NIC1, etc., modify it according to your own name. , and (2,1,253) is modified according to the start and end of the IP to be bound. Here we only take /24 as an example. In fact, we will also encounter /28, /27, /26, etc., then the final subnet mask The code part is modified according to the actual situation. This command is suitable for windows2003/2008/2012, etc.
I use CentOS as an example for the Linux system (mainly because I don’t know how to use other systems), and the binding methods of CentOS6 and 7 are different. Many tutorials on the Internet write the same method for centos7 as for 6. Anyway, I tried following the centos6 method. The method failed to bind in centos7. However, whether it is centos6 or 7, the steps are the same, but the content is different. We first determine the network card name, which can be viewed in the /etc/sysconfig/network-scripts/ directory, such as eth0. Centos binds IPs in batches by creating range files.
vi /etc/sysconfig/network-scripts/ifcfg-eth0-range0
Add content (CentOS6.* or previous systems):
DEVICE=eth0
BOOTPROTO=static
IPADDR_START=192.168 .1.2
IPADDR_END=192.168.1.254
CLONENUM_START=0
NETMASK=255.255.255.0
ONBOOT=yes
If it is CentOS7, it is recommended to write:
IPADDR_START=192.168.1.2
IPADDR_END=192.168.1.254
PREFIX=24
CLONENUM_STAR=0
Save the file after writing, and then restart the network card.
