In addition to VPS and physical servers, BudgetVM also launched the Cloud Servers series last year. I think it is actually equivalent to a VPS with more independent resources, but its management interface is slightly different from that of a VPS.BudgetVMThe member center and product management panel currently used are designed by myself. Today I will share the cloud server (Cloud Servers) management panel.
This article mainly shares the management panel, product information and how to purchase reference: https://www.vpsok.net/coupons/article_3606.html
First, we log in to the member center , BudgetVM official website: www.budgetvm.com
Click Cloud Servers on the left to see your own host information. If you purchased multiple cloud copies You can see multiple lines for the server. Find the Cloud Servers that need to be managed and click the Manage button at the back.

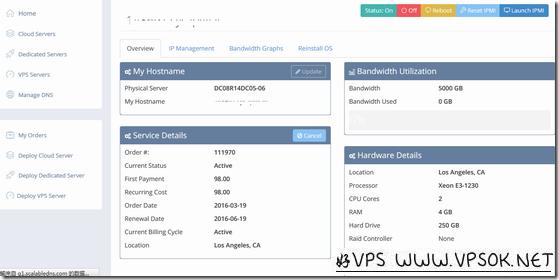
The picture above shows the cloud server management page. We will introduce it in turn.
Overview is divided into 4 windows. The upper left My Hostname can modify the host name; the lower left is Service Details service information, including product status, price, purchase and expiration time, data center and other information; the upper right is traffic usage information; The lower right is configuration information. There are only two operable parts on this page. One is on the upper left where you can modify the host name, and the other is on the lower left where you can click Cancel to cancel the server (don’t click this for normal use).
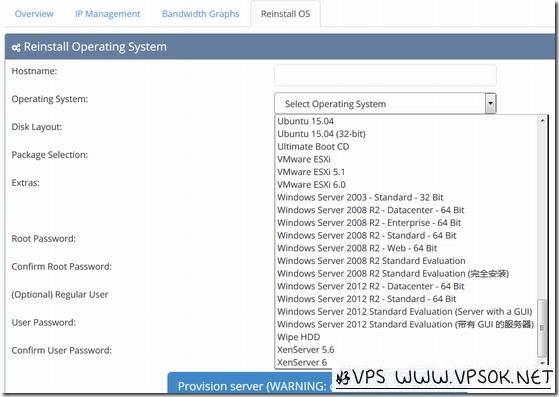
In addition to Overview, the header menu of the page includes IP Management, Bandwidth Graphs and Reinstall OS. IP Management is IP management and supports setting RDNS, while Bandwidth Graphs can check the traffic status. What we do most should be Reinstall OS and reinstall the operating system.

The picture above shows the page for reinstalling the operating system. First, we set the Hostname, and then select the specific system. There are many systems available here, including Linux and Windows. You can choose at will. After that, the main Set the Root Password (enter it twice, the administrator password of the Windows system is also entered here), and then add other users and set the password as optional. You can not fill it in. After filling in everything, confirm the submission and start reinstalling. It usually takes a few minutes. It will take ten minutes to complete.
There is also a commonly used function to capture a picture, which is located in the upper right corner of the entire page. Including host running status, power on and off, restarting the host, and the following Reset IPMI and Lanuch IPMI are VNC functions. The actual cloud server is not a physical server.

