There seem to be many tutorials on the use of DA panel on the Internet, but Good VPS found that many people still encountered some problems during the operation to consult, so I will use the space I provided as a guide. For example, we will explain the usage process of DA panel from aspects such as rice binding, file upload, online decompression, and database.
【Domain name usage】
Everyone who applies for the space provided by VPS will receive a free third-level domain name with the suffix free3.vpsok.net, but I believe that not many people We used this domain name to build the website. In fact, this domain name can be deleted, and we can also add our own domain name.
First of all, log in to our DA panel (don’t ask me for the username and password, I’ve emailed it to you~), click "Domain Name Management" in the panel (don't look for it, in The third one in the last row O(∩_∩)O~), I won’t take a screenshot of this, save me some blog space. The following is a screenshot after opening:

[File upload]
To build a website, we also need to transfer our web page files to the space, such as our common blog source code :wordpress. In order to make the transmission convenient and fast, we need to package the files first. It is worth noting that DA does not support the common RAR compression format in China. Please compress it into Zip format and then upload it. You can choose the FTP tool to upload it, or directly upload it in the background. Here I will mainly talk about background upload.
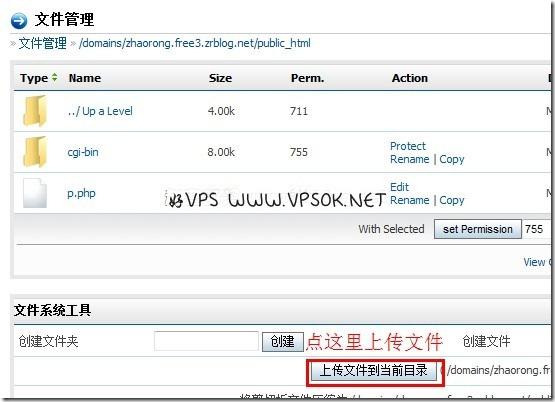
Log in to the DA panel, click the file manager in the interface, and enter your website file directory. Here I will talk about each folder. There is usually a domains directory and a Public_html folder. After clicking on the domains folder, it will be the domain name bound to your space. DA will generate a folder for each domain name by default. Click on public_html under the domain name folder, and the files of our website will be placed here. As for the Public_html you see when you open the file manager, this is a shortcut that points to the directory of the default domain name of the DA panel (for example, if you have not bound any domain name, it is the third-level domain name directory I gave you)
Below, Start upload.

On the page after that, click Browse, select your local compressed package, then click to upload the file, and just wait~! (Please note that the default maximum file uploaded in the background is 10MB. If this limit is exceeded, please separate multiple compressed packages)
[Online decompression]

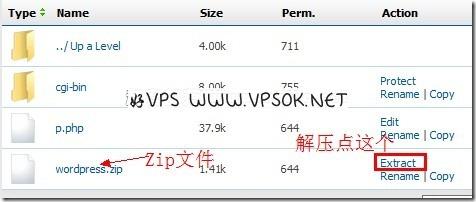
Everyone sees the compressed package Did I frame the Extract at the end of the file? Click it to unzip it!
[Database]
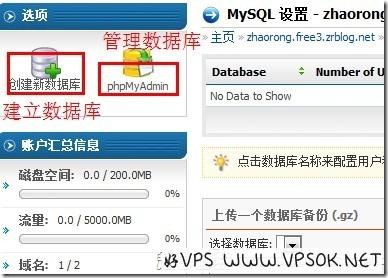
Return to the home page, click on the first one in the fourth row, MySQL Management, to open it.

To create a new database, please click Create Database. After that, fill in the database user name and set password you want (2 times), and it’s OK~ ***What should be noted here is that, The database name is a name prefixed with your user name. When installing the program, please fill in the complete ***
[Postscript]
In fact, the function of the DA panel is very powerful , although it is not as good as CP in some aspects, it is completely sufficient. If you encounter any problems during use, please reply here and I will try my best to help.

