Okay, I'm stupid. I changed the system again today to test Proxmox VE for everyone. I also marked it so that I can find it easily. At the beginning of the article, I need to wrap up some of the questions after the previous article. Please note that these tutorials on how to open a chicken recently shared by Hao VPS are only for personal use and are not for commercial use. For example, the XenServer series tutorials, if you want to use them If it opens a VPS to sell, it is better to just buy a Yungu system. There are also some loyal readers who ask me if I am going to enter the VPS industry. This is absolutely impossible. I don’t have the money or technology. I am just playing for fun. I do not constitute any competition with IDC. What should readers buy? What else are you buying? Don’t wait for me. O(∩_∩)O~
I find that there are more and more nonsense lately. Maybe it’s because of my age. Let’s get back to the topic. First, let’s take a look at Proxmox VE. I searched a lot, but I didn’t want to copy it, and copying it is an abstract thing, so I’ll put it bluntly: I installed it because it can open OpenVZ and KVM, it’s that simple! This article will be written in two main parts, one is the installation of Proxmox VE, and the other is using it to open a VPS. Because it is a bit long, screenshots are not taken for every step. Some are too simple. I will not take screenshots if they are not necessary. Only the important parts are taken. Please understand.
First, let’s take a look at how to install Proxmox VE. There are two methods:
1. Install Debian first, and then add the proxmox installation source for installation;
2. Directly download the Proxmox iso file for installation.
[Tip]This article involves many pictures, which may cause slow loading. We apologize for your understanding.
In the upper right corner of the Proxmox VE management page, we can see "Create VM" and "Create CT". Creating a VM here means opening KVM, and creating a CT means opening OpenVZ.
Before opening, we need to put the system template into the specified directory. You can download the OpenVZ system template from the OpenVZ official website. They provide a lot of system templates, with the suffix tar.gz, and put them into the server/var/lib /vz/template/cache directory;
The operating system of KVM is an installation image ISO file. You can find the installation files of Linux from the official website of major distributions, while the installation files of Windows are even simpler. For example, there are many ISO files of Windows 2003. It is provided in various places. KVM system files are placed in the server /var/lib/vz/template/iso directory.
Next, we open OpenVZ. Before opening, I have put the system template CentOS6 32bit into the designated folder and click "Create CT" in the upper right corner of the management page, as shown below. In this step, we need to fill in the hostname and root password, then next step.

The following is to select the system template. If your system template file is not placed in the specified directory, there is no system template available here. You can see the CentOS6.
I put in in the picture below. ph7>
The next step is to set the VPS configuration, including the number of memory, hard disk and CPU cores.

Next, upgrade the network settings. I have read many tutorials. Here I choose bridge mode. However, I recommend that you choose routing mode and set the IP address directly, especially if the machine cannot obtain the IP through DHCP. when.

The following is DNS, just ignore this page.

Finally, all the information we set is listed. If everything is correct, you can click "Finish" to confirm the submission.

Then, the system starts to create the VPS and there is a progress prompt.

After completion, we can see on the left that there is a VPS. We can select it and click the menu to start, stop, or delete.
After startup, we can directly connect to the VPS through SSH and use this VPS.
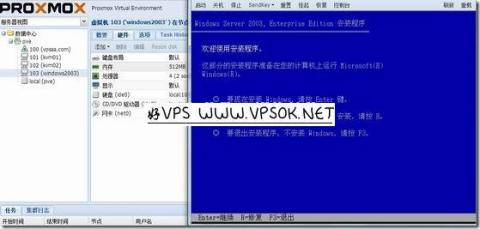
Next, let’s take a look at how to set up a KVM. Most of our previous tutorials take setting up a Linux system VPS as an example. For the KVM we set up today, a good VPS would put a Windows 2003 ISO file. First of all, we have Put the ISO into the specified folder. Since part of the process is basically the same as the above for establishing OpenVZ, I will focus on text explanations here.
First, click "Create VM" on the right side of the page. The first step is to fill in the name. It is OK to fill it in casually, and then the next step;

As shown above, this is the OS tab. Content, here I am going to install Windows 2003, so I choose directly.
The following is to select the system installation template ISO. I put 2 ISOs, one CentOS and one windows2003. Here we select windows2003 and then take the next step.

There is no need to take screenshots for the following hard disk, CPU and memory settings. Just like OpenVZ, the picture below is the network tab. Please select the bridge mode here. Also note that you can select the network card here. Yes, there are three options to choose from. If there is any problem, you can finally switch to the available network card after installing Windows.

The last step is to list all the setting information, confirm completion, and the system will start to create the VM.
After completion, select the VM we created and click Start.

Then, click on the console, which is similar to the VNC we use in the SolusVM panel. Click to load the Java component, and then install Windows 2003 step by step, just like we use a CD to install the system locally. , no need to take screenshots?

Proxmox is really a very good thing, especially it is very convenient to open a proxmox for your own use. You can open two proxmox with different virtual architectures on the same server at the same time. He also has There are many interesting functions, such as multi-user, clustering, etc. Interested children can play with it.